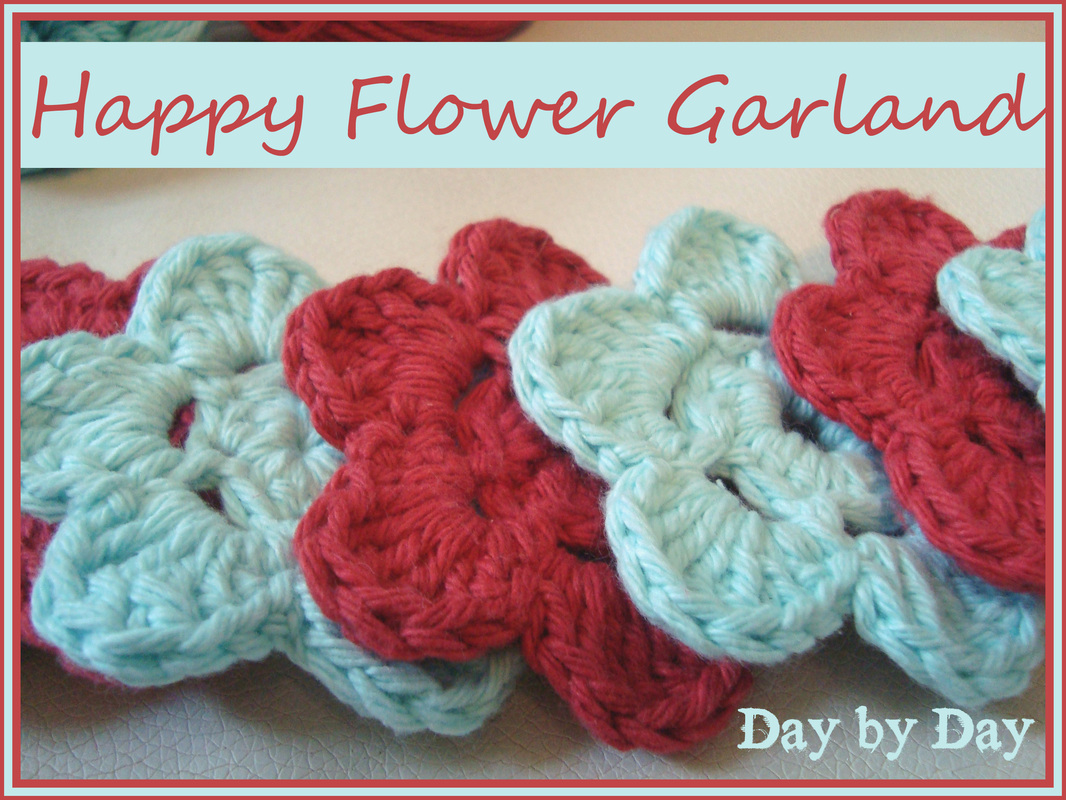
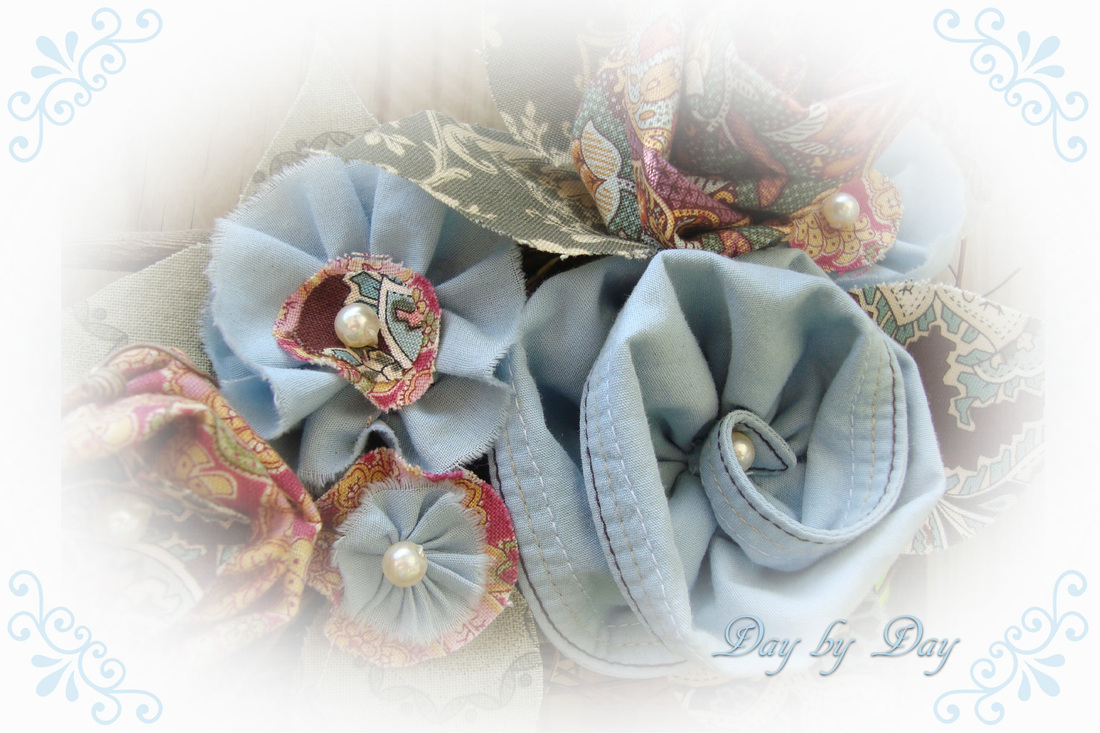
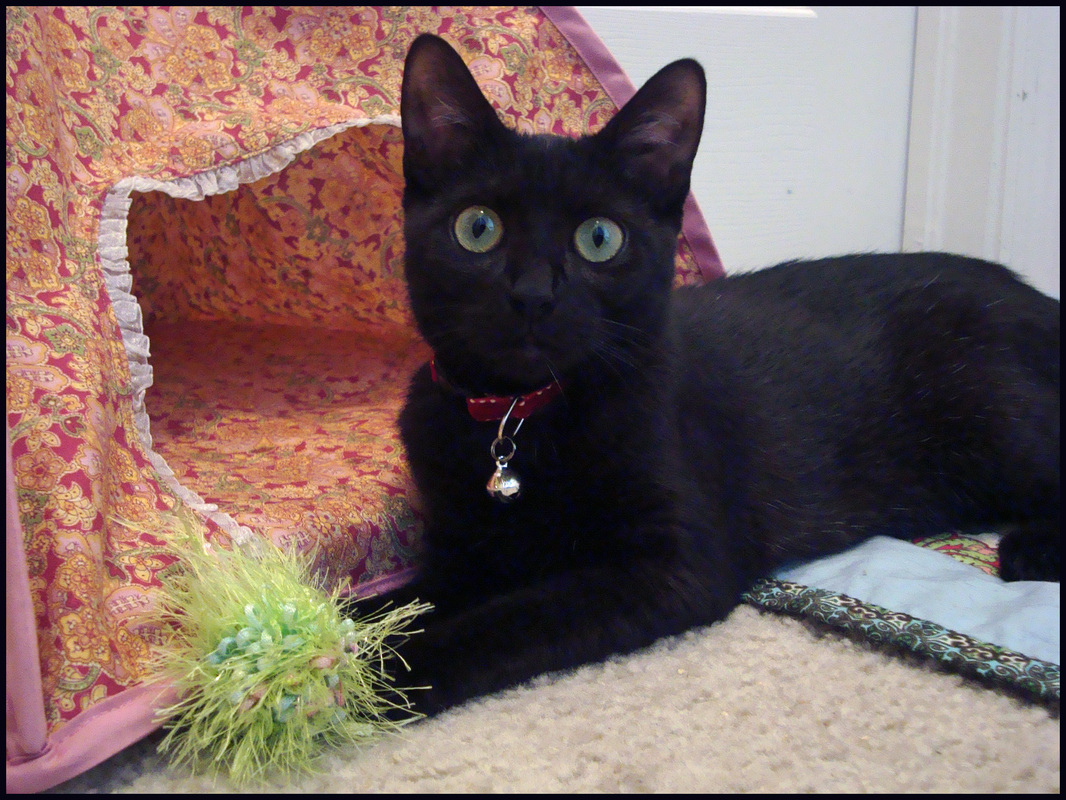
I've been prettying up my new workroom with little pops of handmade color since I painted the walls a simple white and moved everything into it several weeks ago. Despite my usual love of bold, vibrant color I decided to leave the room itself white because there is always such glorious sunshine flooding through the window and balcony door to transform the walls to a lovely warm yellow. It lessens the need for so much extra artificial lighting and makes sewing and close-work a pleasure. For ages now I've been eyeing the flower garland creations made by Claudia from Mockingbird Hill Cottage. She has a variety of different colored garlands available for purchase in her Etsy shop, so head on over and take a look if you're interested in having one of these beautiful garlands of your very own--she will even use specific color combinations upon request. I've actually been working on this garland for a while, not due to any great degree of difficulty but because I only work on it when I sit down for a few minutes in front of the TV.... and that hasn't been very often lately! I have finally managed to amass nine of these little beauties, and they've found a place to call home on one of my pristine walls. Aren't they happy little things?! I really love the combination of rosewood and light turquoise, and I even ran across a fat quarter with a floral pattern in similar tones--which I plan to somehow integrate into the garland at some point soon! Now on to the next project... photos to follow!
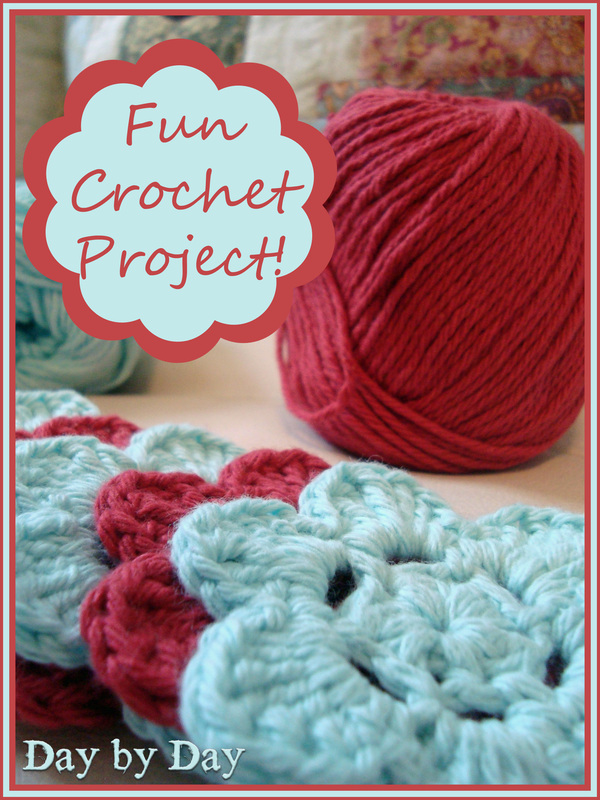
Happy (almost) weekend, everyone!
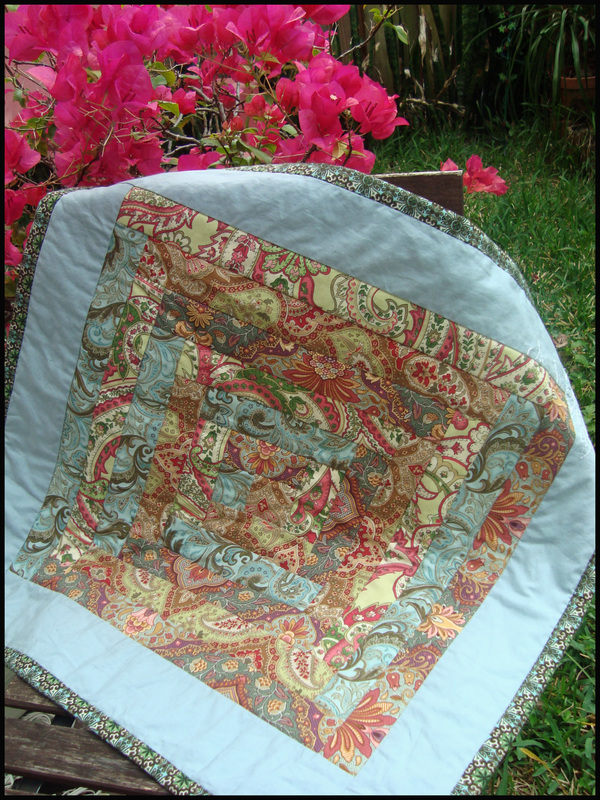
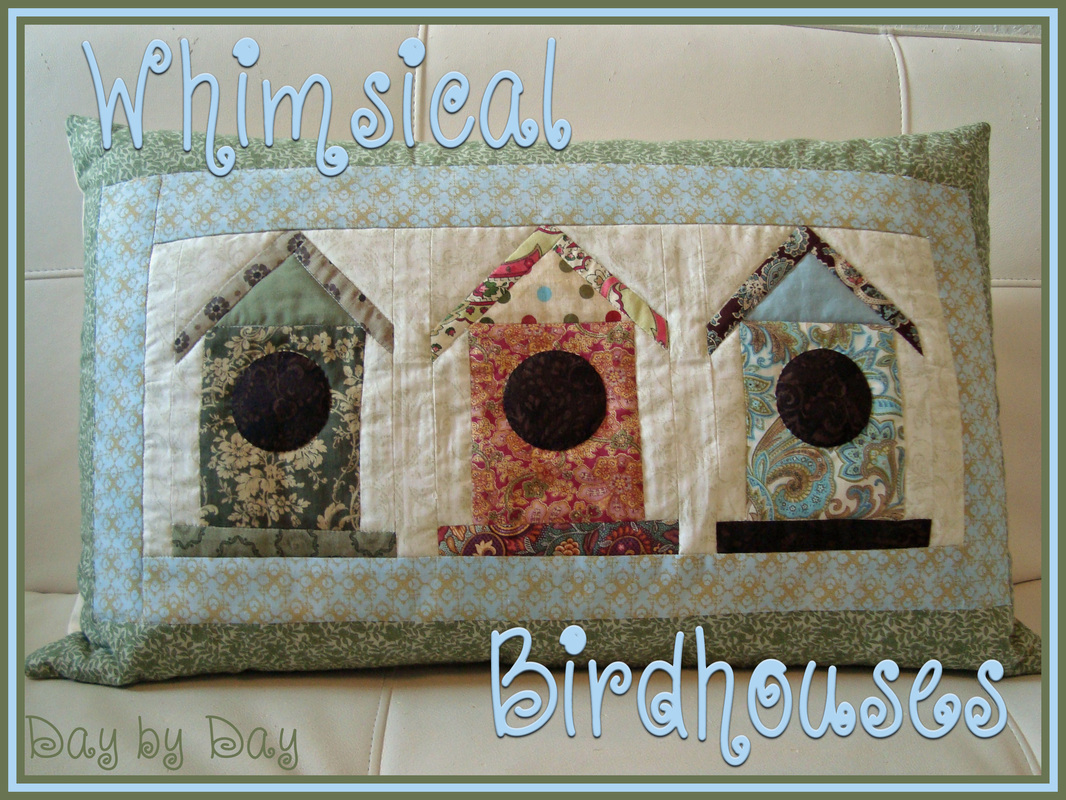
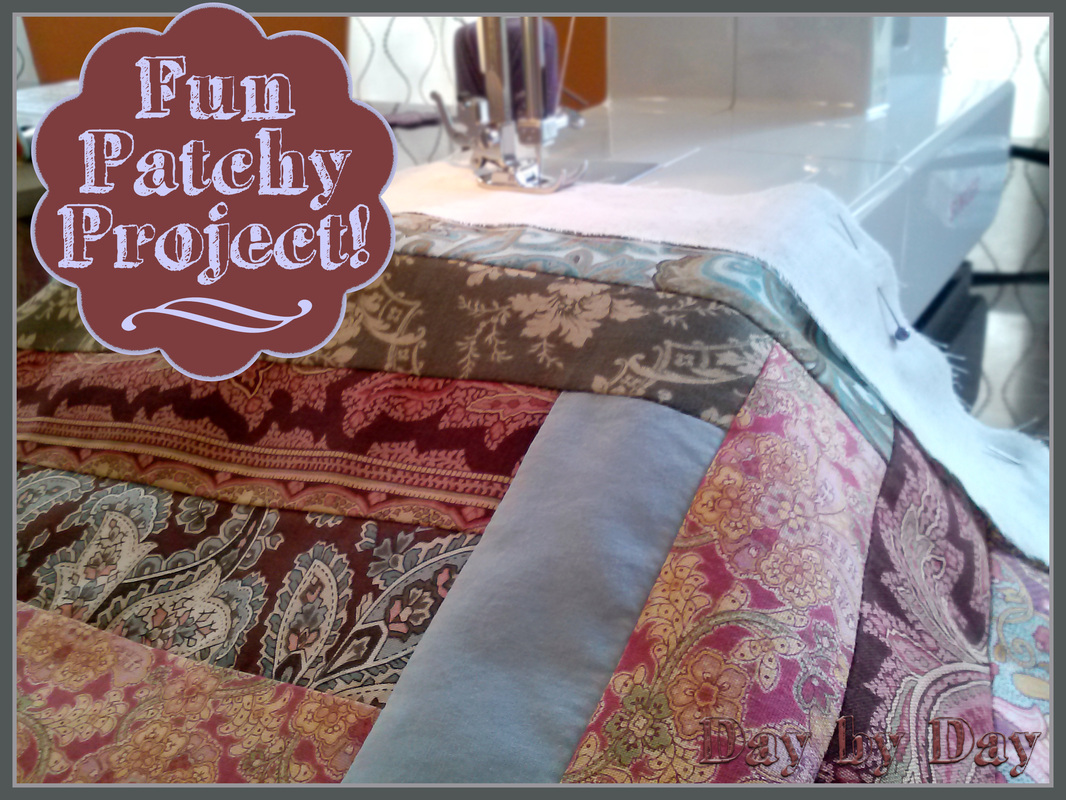
There are so many talented crafters and creaters out there in the blogosphere! I confess that I have a computer file entitled 'cool stuff & ideas' and whenever I see something that inspires me, I shove it in that file for future reference. This fun project falls into that category... 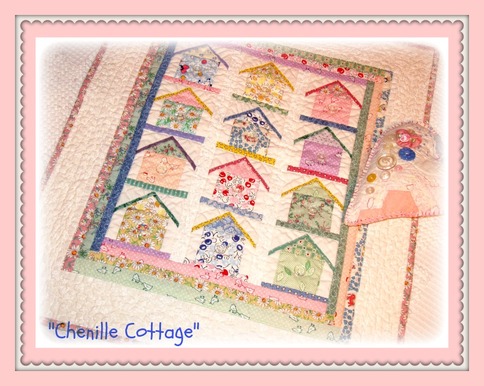 I fell in love with this little quilt from Carolynn at Chenille Cottage--isn't it adorable? She was featuring her guest bedroom and this little beauty was peeking out from the top of a dresser where it was part of a display... I love the mix of colors and patterns, and the quasi-log cabin perimeter.
You all know how I love my modified log cabin pattern! You can click on the photo and it will open a link to her post so you can see it for yourself!
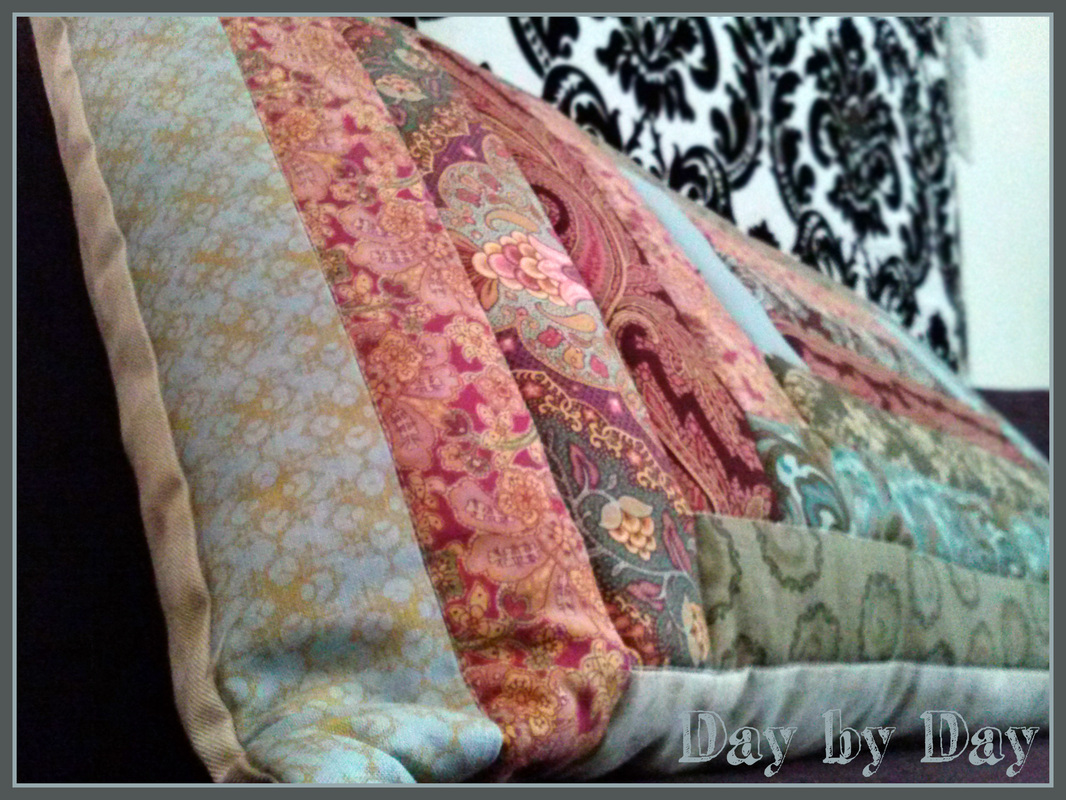
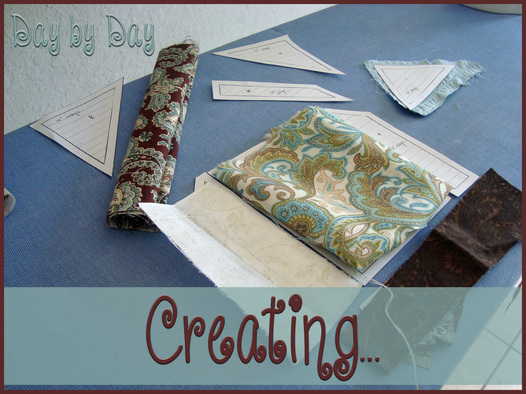
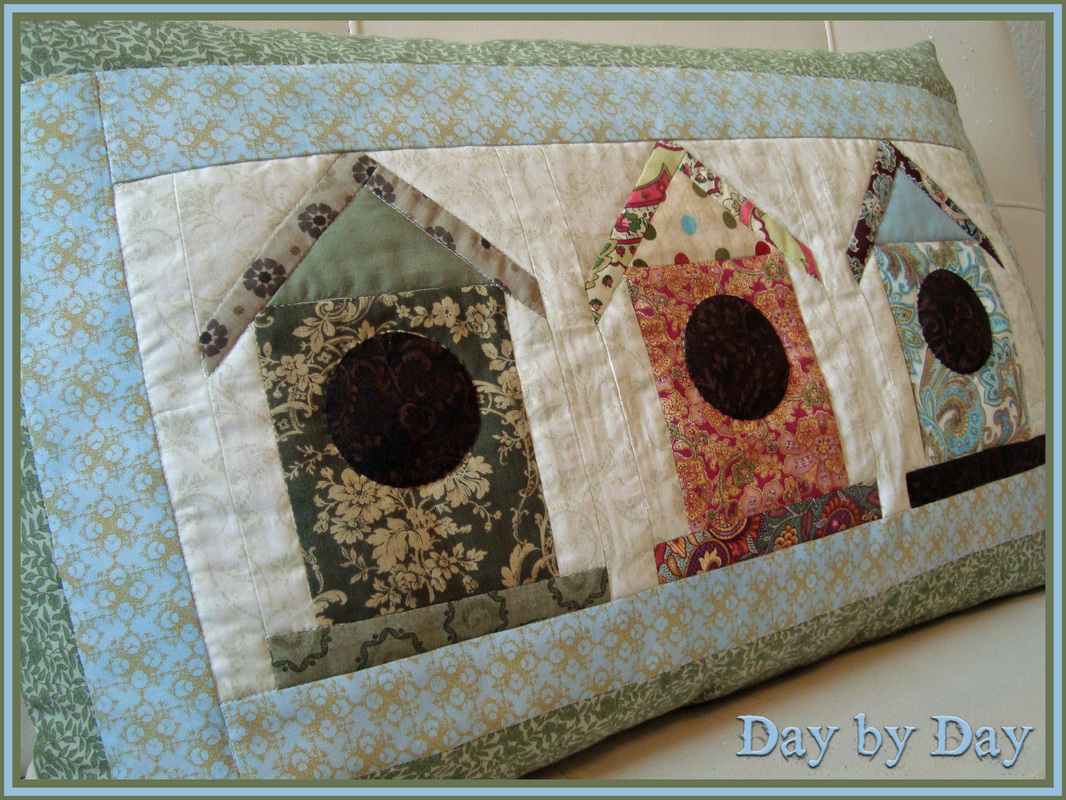
I drooled over the quilt for about a week and decided that I needed to attempt something similar, so one morning I sat down with a cup of coffee and my ideas and drafted out my own version of the pattern... Yet another project to use up some of my favorite fabric scraps! For this project I actually took the time to draft the pattern, add inlays, and keep a copy of it so I could replicate it at some point in the future. Something you need to know about me is that I often start out a project with just an idea in my head and no set pattern. I play around with fabrics and make things... handbags, coin purses, accessories, you name it. More often than not I don't have a solid pattern. I've done that all my life--and it's a bad habit that I really need to break for the sake of consistency. And here it is! A sister for my modified log cabin cushion to cover the world's ugliest pillow #2. They're happy to hang out together side-by-side on the sofa in my new sewing/work room, and they add a bit of color and charm to my workspace. I am so happy with the way the pattern turned out! I may just make a wall hanging using my pattern and add in a little appliqued birdie... stay tuned for a creative update on that! The finished result is a combination of traditional piecing, hand applique, machine quilting, and hand quilting. If anyone is interested in trying the pattern for themself, feel free to leave me a comment and I'll share my pattern with you.
Happy Tax Day!
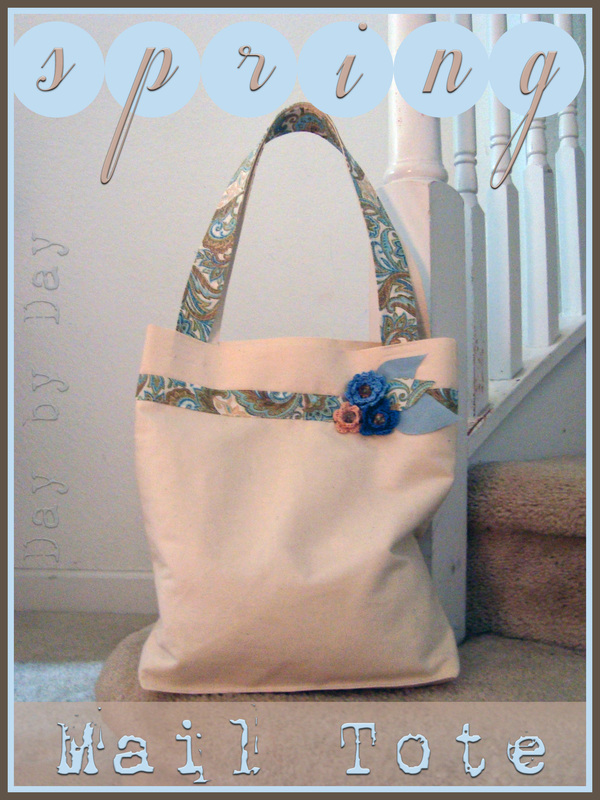
I've been meaning to make this tote for ages now, and last week I finally dove into my fabric stash and came up with enough odds and ends to make it! There is such a great sense of accomplishment when you finally finish a project that you've been procrastinating over for a long time, isn't there?
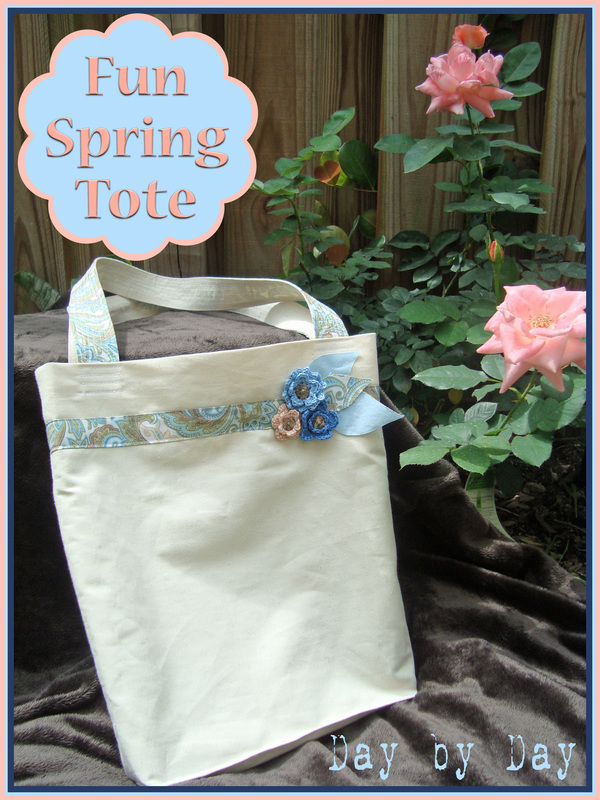
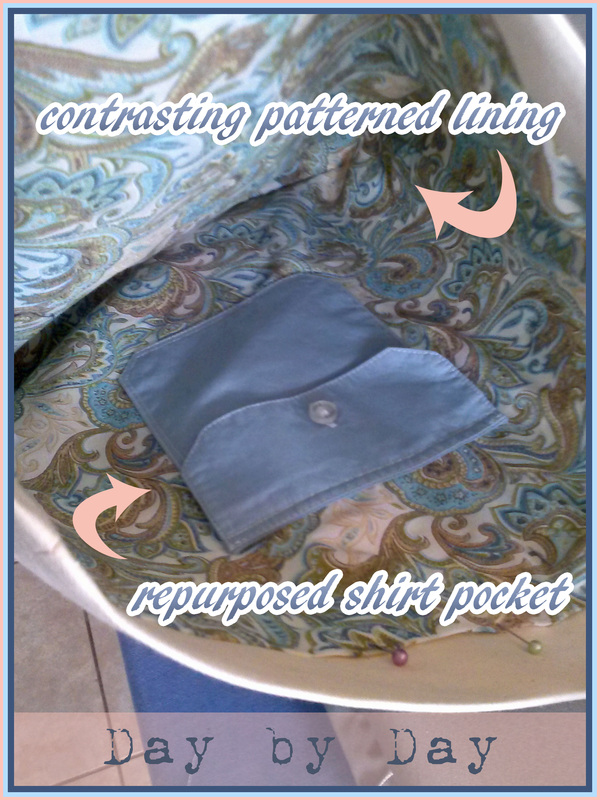
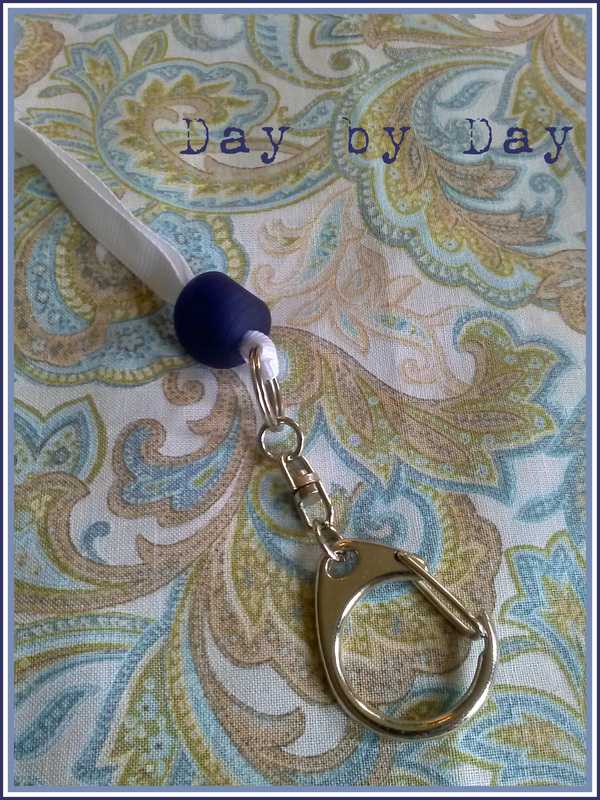
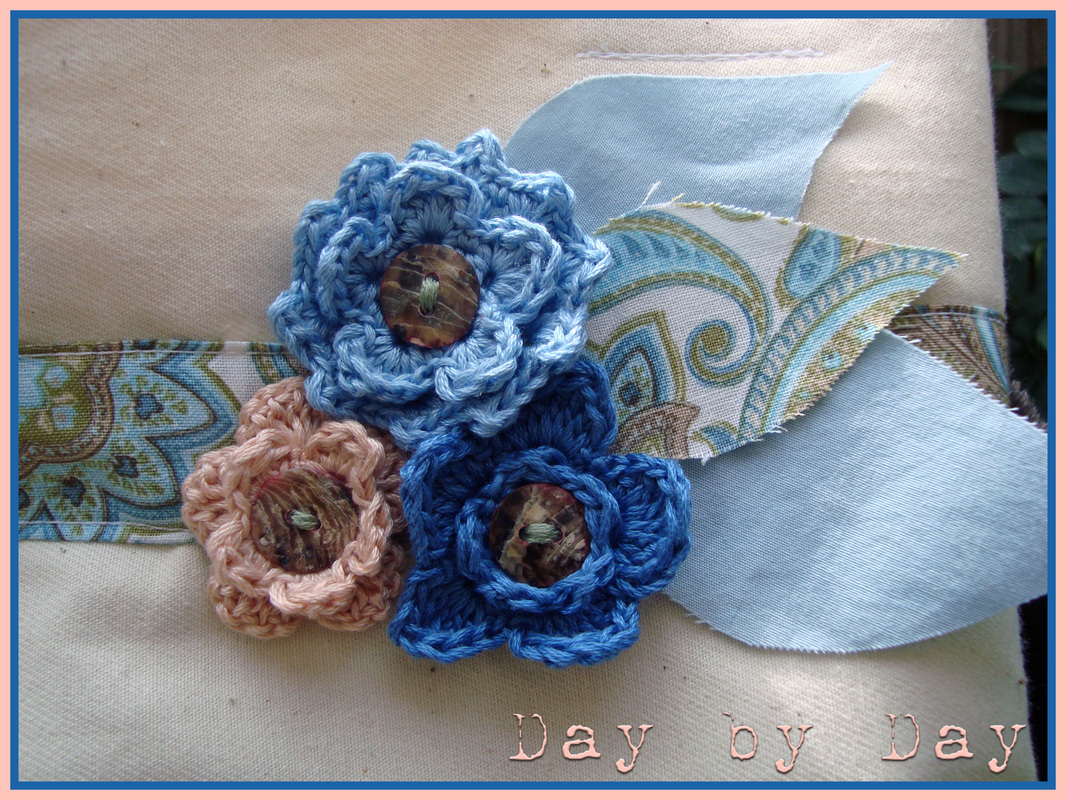
This little beauty is actually a mail bag--I swear, we receive more mail than anyone in the country, and I always go to collect it when I go for a stroll around the neighborhood with my Charlie Dog. I'm all about multi-tasking, but we run into problems when I have Charlie's leash in one hand and my phone, mail bag, and keys in the other one. If it is really hot and I'm wearing a skirt or shorts, I usually don't have a pocket to use, so I was in dire need of a multi-functional tote where I could stash my phone and keys as well as the mail. And here it is! I used a natural heavy cotton twill for the body of the bag and lined it with a pretty summery blue paisley, then added a contrasting stripe of the lining fabric around the outside. I liked the blue paisley so much that I ended up using it as contrast for the handles as well, and placed them so they would be visible on the right side of the tote. Inside I used a repurposed blue shirt pocket (my husband's old shirt has been reincarnated in countless projects now!) and also attached a long grosgrain ribbon with a key fob to attach my keys. I had originally planned on using pink floral scrap fabric from Sophie Kitty's little tent, but when I went to cut out the lining, I realized that I didn't have enough of it for this project... so I had to set aside my crochet cutie flowers in shades of pink and purple and whipped up a few new ones in blues and peach with some embroidery floss I had hidden away. My sewing and crafting stash never ceases to amaze me--I swear, I have things in it that I'm sure I have long forgotten! I'm so pleased with this tote--I debuted it last week, and it makes my life so much easier when it comes to mail time! I love the fact that it's kind of pretty and girly without being too 'every little girl is a princess'-esque. I confess I have issues with that. I have to admit that I've had a terrible time trying to photograph it... the colors just aren't coming out true to shade, and every shot seems to look dull and lifeless. Apologies for that. As Charlie is my constant mail-collecting companion, when he decided to photo bomb my little snapshot session, I decided to include him--he gives this project his seal of approval! Here we are in another week again... what are you working on this week?!
Happy Crafting!
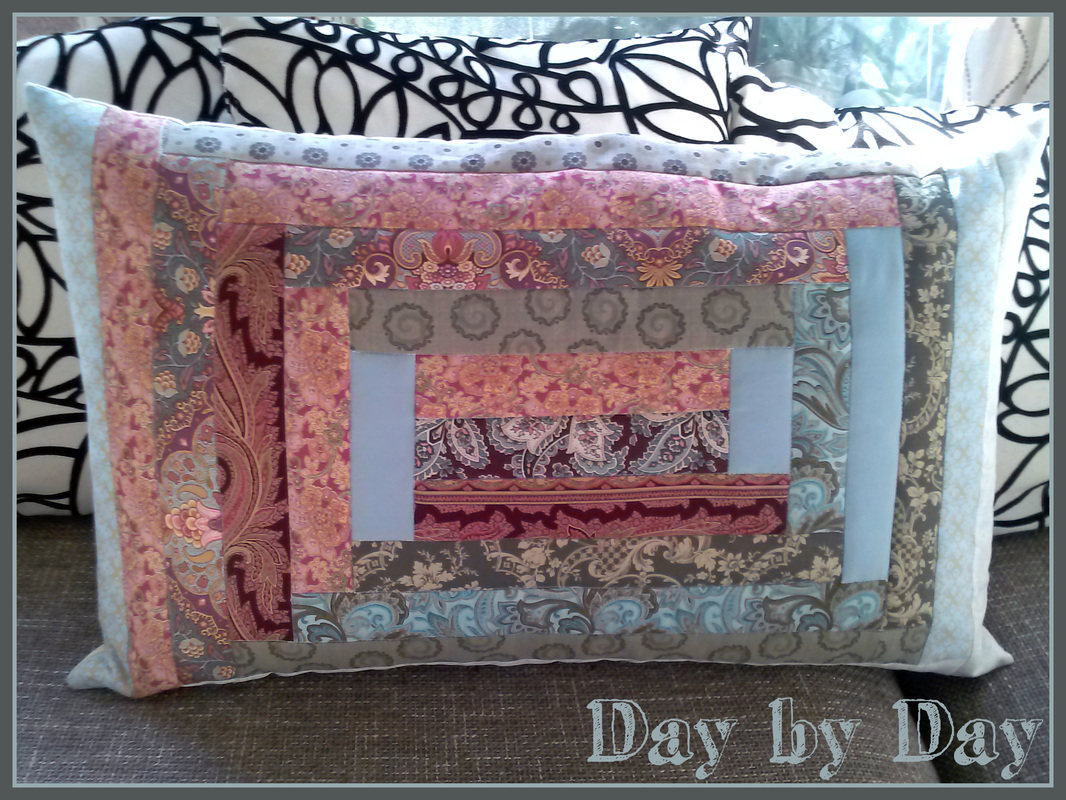
Any of you who have been with me for a while will be aware of my love of all things patchwork. I have been doing a ton of projects lately that involve enjoyable ways to use up some of my fabric scrap stash, and this week I've completed two projects that I am so pleased with! I have always loved playing around with a modified log cabin pattern, and I put that motif to good use in making a beautiful quilted pillow cover. The backstory of this unassuming pillow is a turbulent one... it belongs to a set of three comfortable feather pillows that came with our big 4-piece sectional sofa two years ago. Sadly, the aesthetic of the pillow coverings just didn't match their comfort factor, and I kept hiding them away in a closet never to come out unless we absolutely needed them. Here it is, the before: See, I told you! The ugliest pillow covering ever made. It doesn't even deserve photo embellishment. So finally, after two years of procrastination and trying to decide how I wanted to cover those sad pillows, I pulled out my fabric scrap stash and went to work. (Totally off-topic, but I've been eating a lot of oatmeal lately, I chalk up my sudden burst of creative energy to that.)
The pillow is 27" x 17" and I used 2" fabric strips and made a random pattern. I confess that I ran out of scraps that were long enough to finish the last few rows of the patchwork, so I broke down and bought a couple of quarter yards to finish it off.
It'll be our secret. I used polyester batting and a plain cotton backing and machine-quilted (stitch-in-the-ditch style) the pattern. I had some natural cotton twill kicking around, so I used that as the pillow cover's reverse side. It's very durable and will wear nicely. I am ridiculously happy with the end result--even though our household aesthetic is neither shabby nor cottagey, I snuck in my own little bit of rustic charm and it makes me smile every time I glance over at it... which I have been doing a lot since I finished it several days ago.
Am I the only crafter who does that? Glances lovingly at their creations... leaves them out in a conspicuous spot just to be able to catch sight of them...?
I think not :-)
Happy mid-week-day everyone!
All human beings are also dream beings.
Dreaming ties all mankind together.
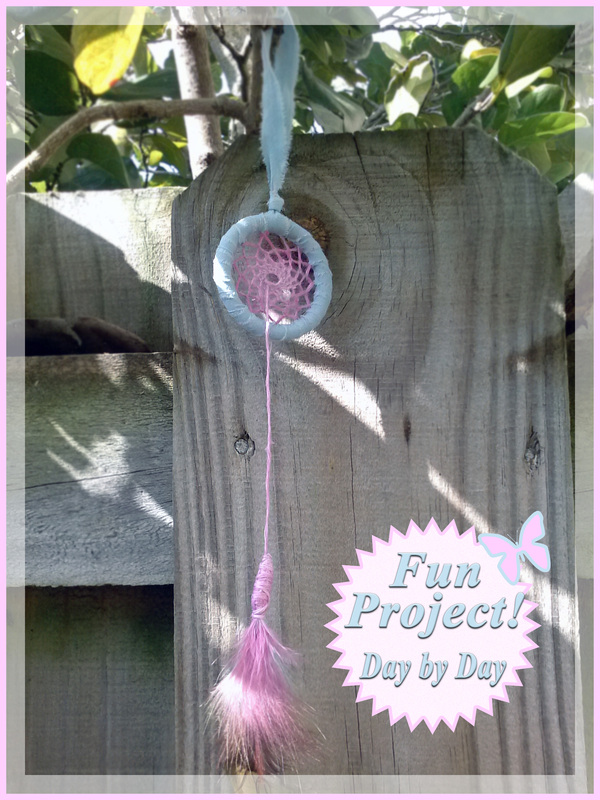
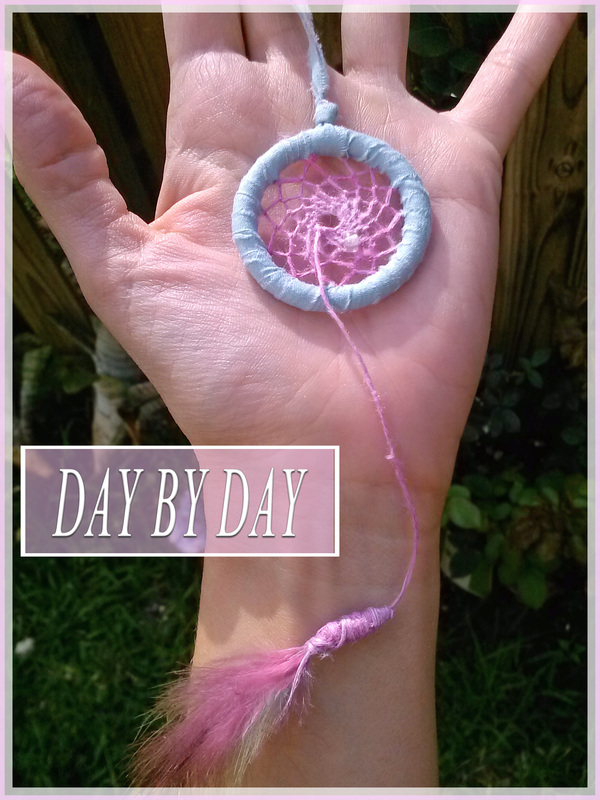
Jack Kerouac For ages now I've been meaning to attempt a Dream Catcher. They're very common in my little hometown corner of Canada as we have a rich Native local tradition and share our corner of the province with the Maliseet people, who are well known for their outstanding handwork skills--particularly beadwork and basket-weaving. Their Dream Catchers vary from very simple and traditional to large and elaborate sporting thread knotwork and beautiful beading. The basic premise of the Dream Catcher is that traditionally it is hung in a place above the sleeper's head in a spot where the morning light will touch it. Bad and unimportant dreams are 'caught' in the web and in the morning's first light they dissolve away. The good, meaningful dreams are concentrated and slide down the thread to the feather and into the sleeper's head. A lovely idea, isn't it? Something all of us could use from time to time, I suspect... I am a terrible magpie and tend to collect random everyday bits and bobs with the intention of eventually using them for various projects--so naturally I have a little collection of small plastic hoops that are perfect for this endeavor! This hoop was clear plastic and is around 1 5/8" (4.2cm) in diameter. I found a great online tutorial at Native Tech with good diagrams explaining how to make a dream catcher, and I used a few odds and ends from my crafting stash to construct my little creation. A strip of scrap fabric to cover the hoop, a length of silk embroidery thread for the web, a bead to represent the spider, and a little feather to tie at the end. Super simple. This is a great little project and would make a wonderful gift--click on the above tutorial link and give it a try for yourself!
Happy Creating!
As much as I lament the lack of pure white snow here in sunny Florida, I really do not envy my friends and family back in Canada who have to endure the long, dark, cold days of winter. The flurry of activity surrounding the holidays gives way to the endless piles of snow and freezing winds of January, and spring seems a million years away as the days tick slowly by.
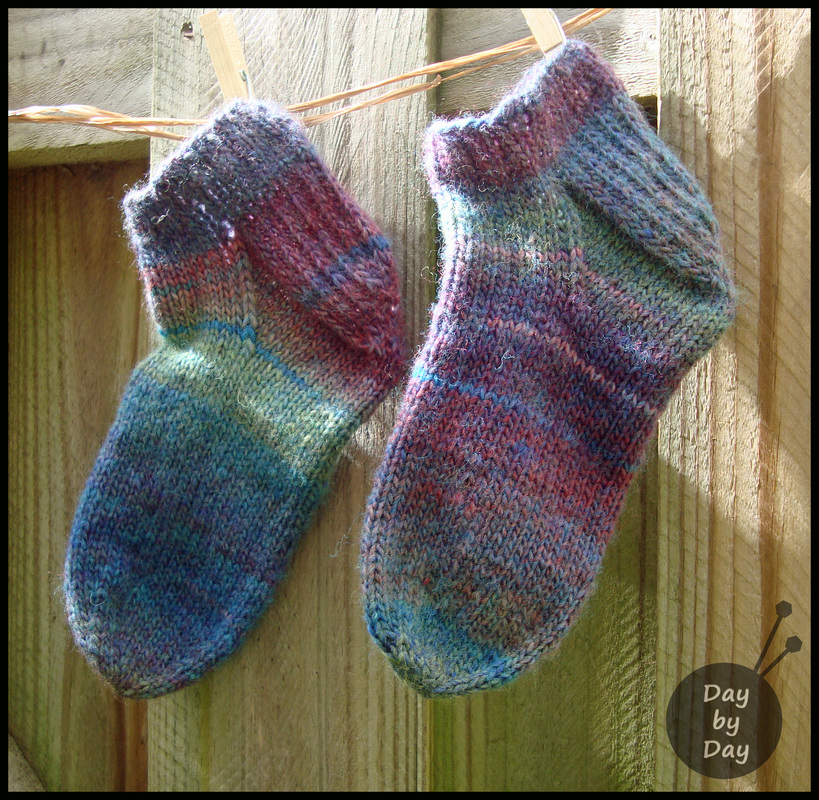
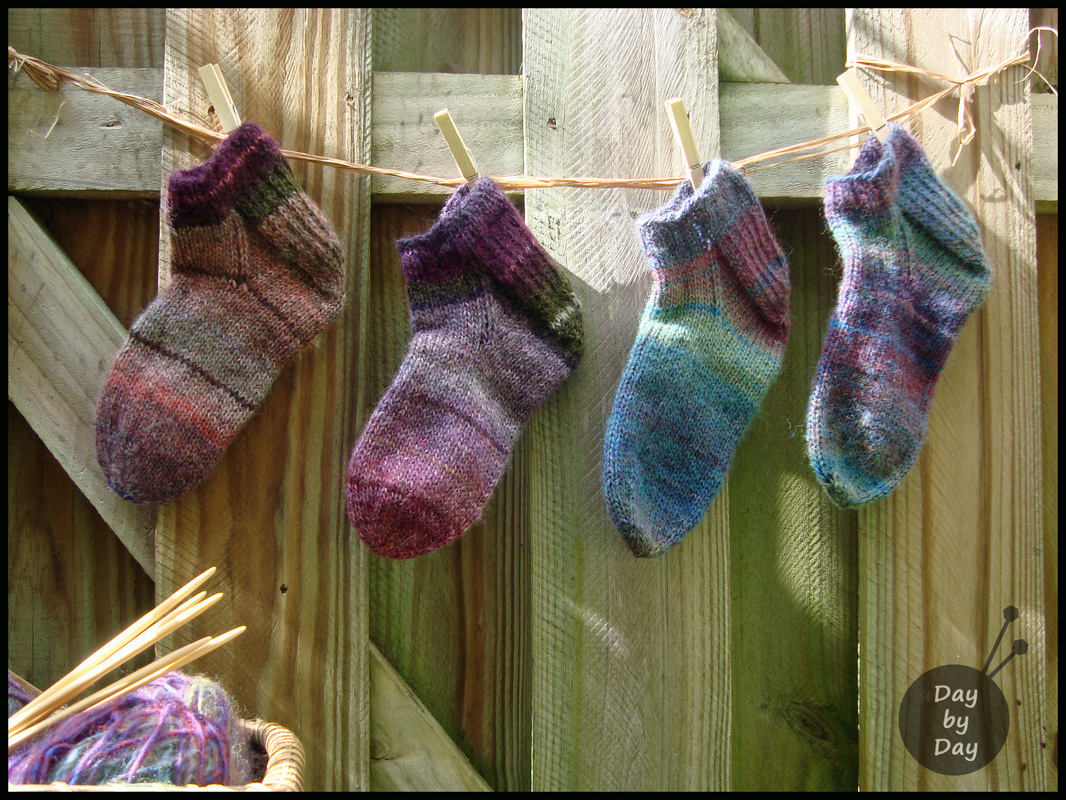
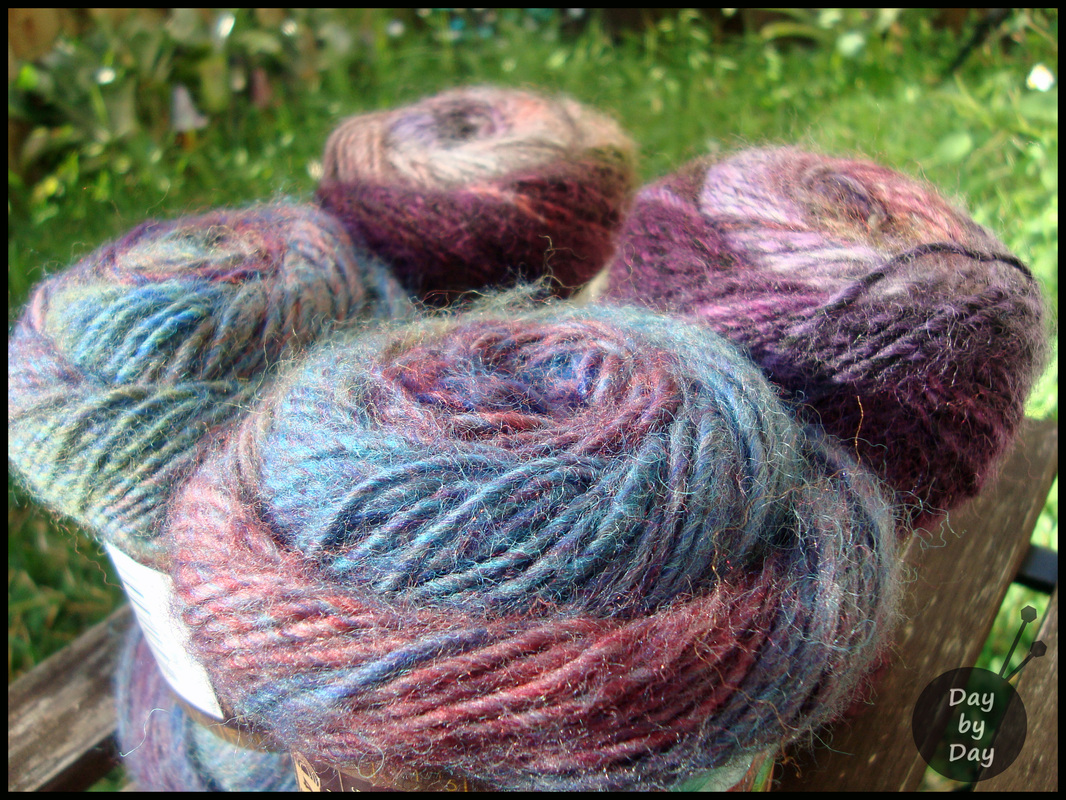
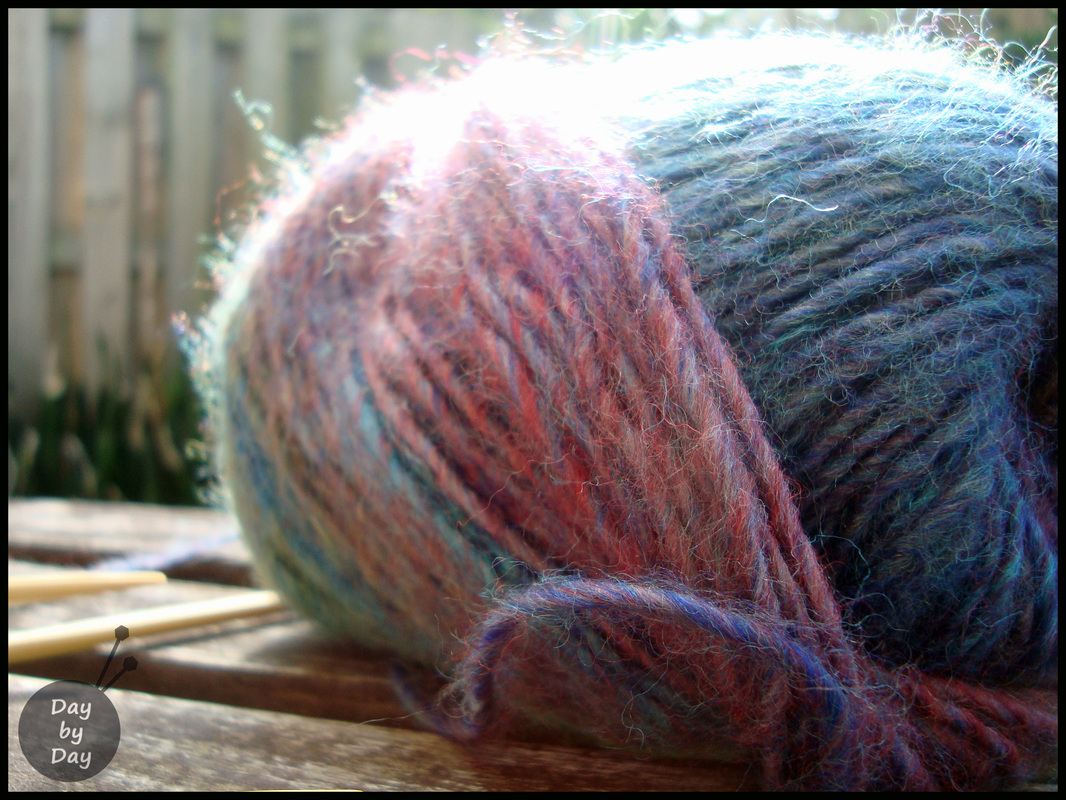
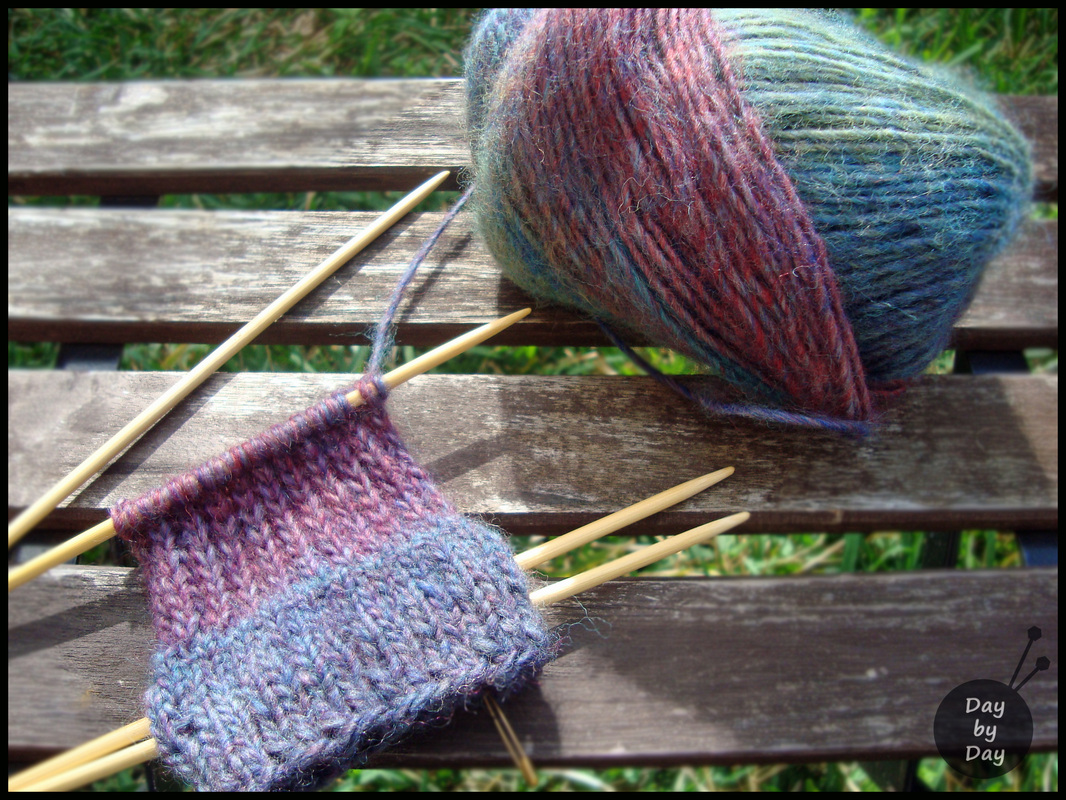
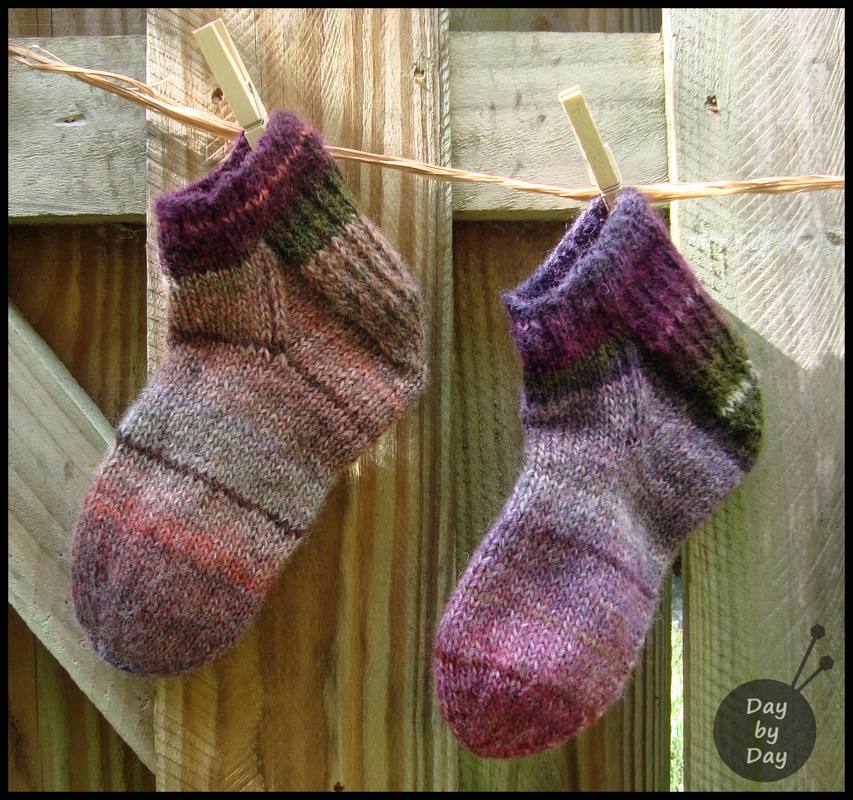
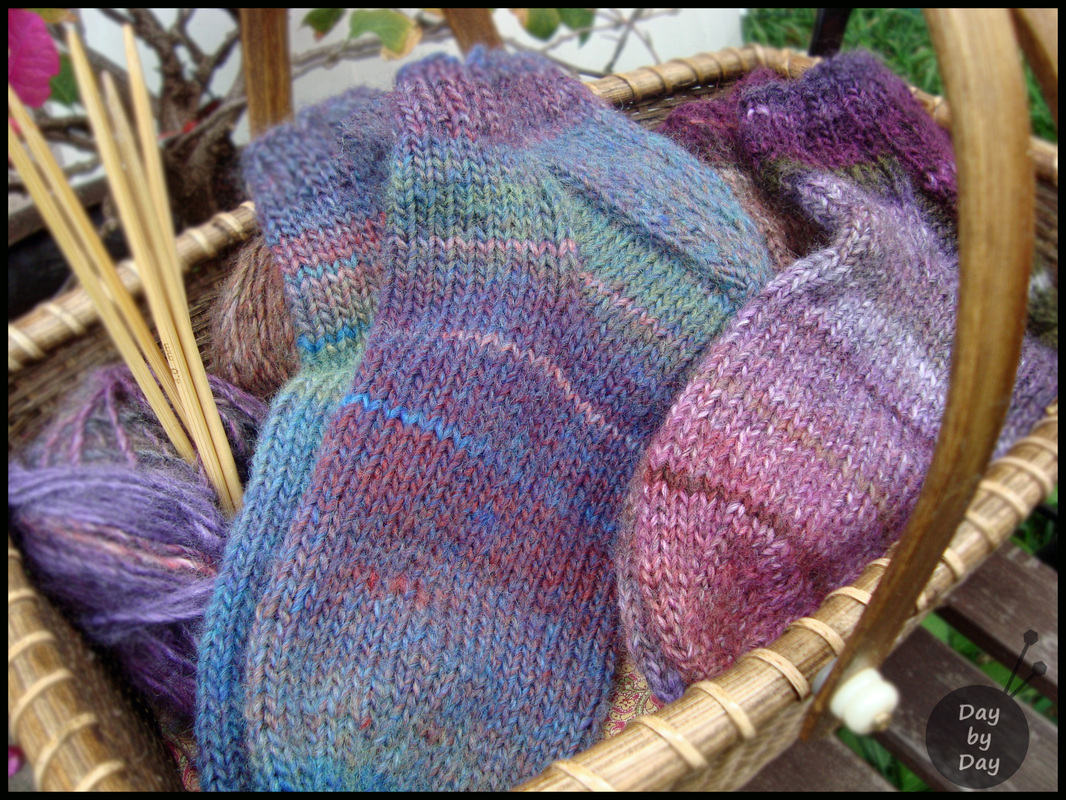
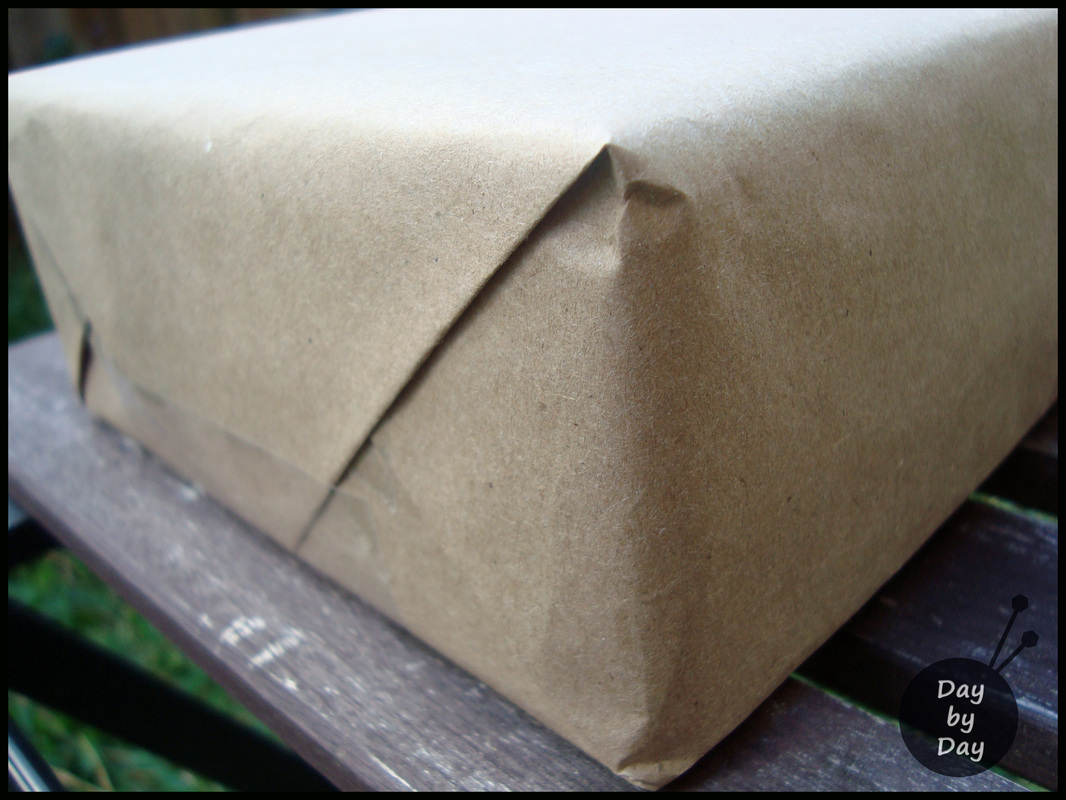
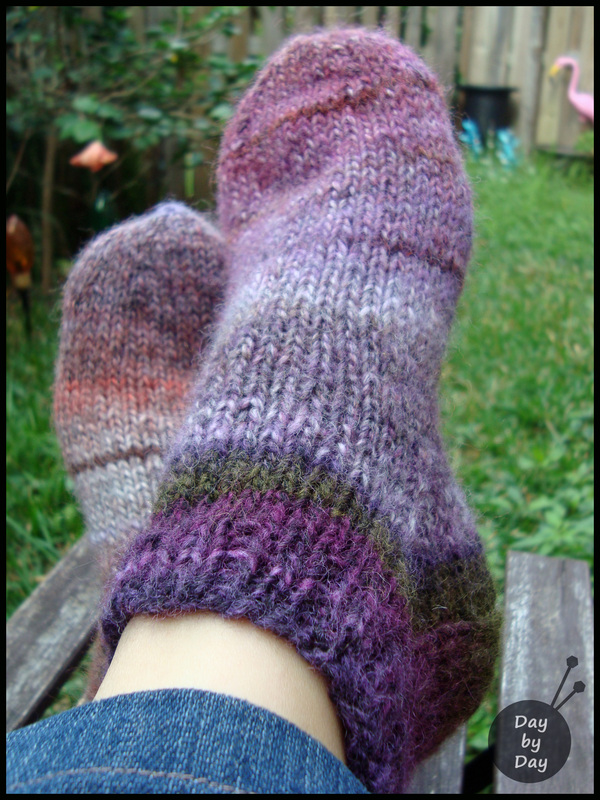
One of my good friends of many years lives waaaaaaay up north in a place that is remote and frigid, and in the days after Christmas I was thinking of her and an idea popped into my head--a surprise winter survival care package! I stumbled across the most beautiful wool, and my knitting fingers got itchy! The color combination is called 'Glacier Bay', and it reminded me of her--the perfect find! I dug out my Mum's instructions for slipper socks--I have knitted so many pairs of these through the years, but it's been a few years since I last made them. Always better to check the pattern! Mum developed these slippers from her old stockings pattern with the most beautifully-turned heels and perfectly-tapered toes which had been taught to her many years ago by my paternal Grandmother. There is a lot of history in these socks! I am so pleased with how they turned out--look at the gorgeous variegated colors! I made the tops of them a bit longer than I normally would to cover the ankles and keep away the northern drafts... ... and I liked them so much that I made myself a pair too! My color is called 'Violets', and I adore the heathered purples and pinks with a touch of mossy green thrown in. Is there anything more pleasant than receiving a surprise package in the mail? When I was in university, living far from home, the best thing in the world was to receive 'snail mail', second only to a care package. To this day I get excited when I open the mailbox and there is a card waiting for me inside. A package? Well, that just makes my whole day! Some of the best things come wrapped in plain brown paper! The slipper socks are snuggled up inside with some winter essentials... Rosebud salve to prevent chapped lips, sparkly moisture cream to add a bit of bling and protect tender skin from the rough Canadian winds, shimmer face hilighter to brighten a face that rarely sees sun at the moment, and a few other fun little treats! I just got a message from her this morning--after two weeks in transit, the package finally arrived! I was waiting to share my project with you until she received the package... just in case the surprise was discovered. You would be surprised how often I've worn my own slipper socks lately--it's been rather cool in the evenings, and these are beautifully cozy when the temperatures dip. Unfortunately the pattern for these is my Mum's jealously-guarded secret as she sells many versions of these year-round at crafting fairs and a local cooperative of like-minded artisans back in my hometown. However, if you are an experienced knitter who has made stockings before, these are very easy to make--you cast on 42 stitches, knit 2 pearl 1 for 6 rows, knit 3 rows, and then knit and turn your heel and continue on as you would for a stocking, working with 14 stitches on each needle once you have turned the heel and decreased back down to 42 sts to knit the foot. Decrease as usual to shape the toe. I hope you're all having a wonderful week--and enjoying your winter projects! What's everyone working on at the moment? I love to see what other crafters are doing :-) True happiness comes from the joy of deeds well done,
the zest of creating things new.
~Antoine de Saint-Euxpery~

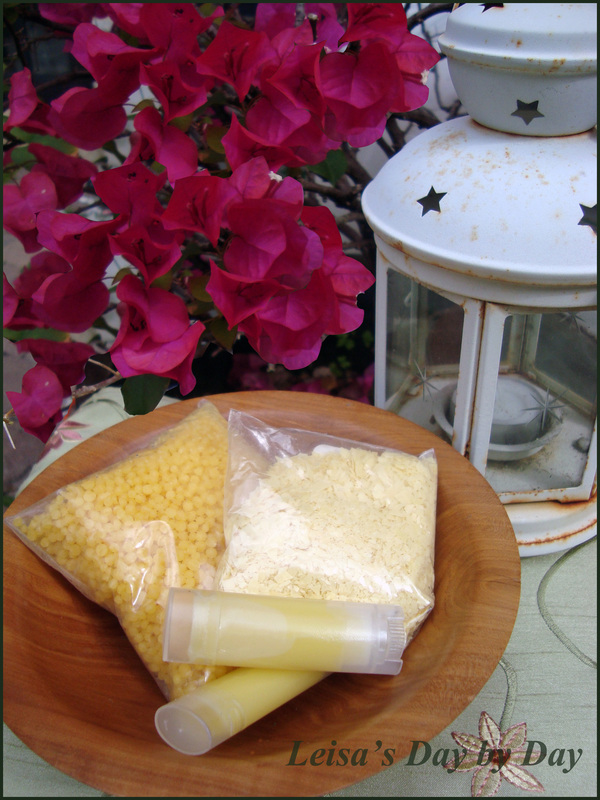
My own natural beeswax lipbalm
Okay... I have written this post and almost finished it THREE times in the last hour... and each time a glitch in the system of my server has deleted the entire post.
So... I am frustrated.
I love technology, but there are days when I could take my laptop and toss it out the window into the garden.
For that reason, I am going to have a cup of tea and forget about technology for a while. I have some knitting to work on (for myself this time, yay!), and I'm going to get lost in Downtown Abbey and knitting for a few hours.
I had the recipe and supply links all done up beautifully... but my head is pounding and I just can't do it again with the threat of losing it for time number FOUR.
The Coles Notes version of the recipe is 1 tablespoon of oil base, 1 tsp of beeswax, 1/4 tsp of carnauba wax, 1/4 tsp of pure vitamin E oil, and 4 lip balm tubes. Warm the oil in a small metal jug over medium-low heat and then stir in the two waxes, swirling to make them dissolve into the oil. Remove from heat and stir in the vitamin E oil, and then carefully pour the liquid balm into the tubes. Let the tubes stand undisturbed for at least half an hour so they set up well.
If anyone needs further instructions, please let me know and I'll send an instruction sheet :-)
Does anyone else have technology meltdown?!
Talent and individual expression are not qualities that just other people possess.
You have it too! All of you have a capacity for creativity in your quilting.
Let yours happen and realize there are no boundaries to your unique expression.
~Anon.
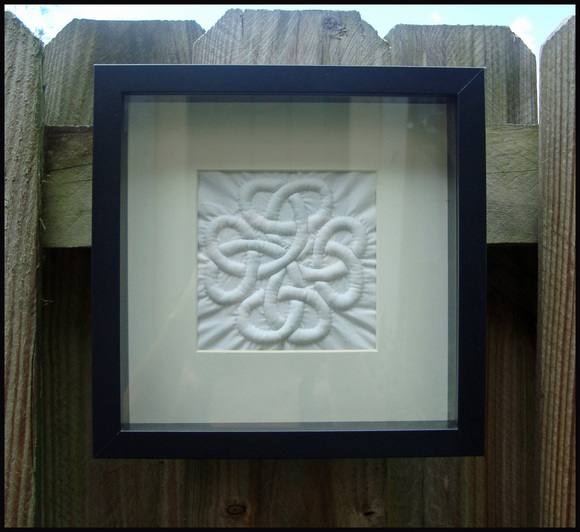
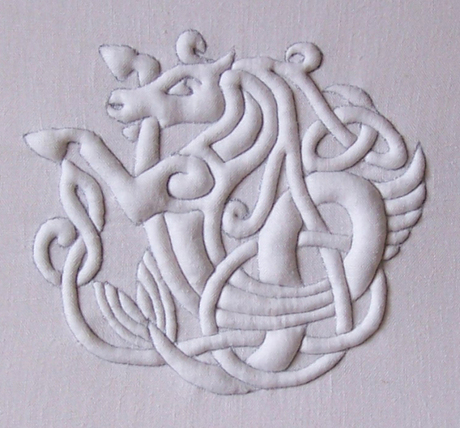
My own Trapunto-worked Celtic Knot
Trapunto. A fantastic word, wouldn't you agree?
In Italian it means 'to embroider', but in stitching circles it is a very specific type of Italian quilting that was very popular during the 1500s and was used to embellish everything from household items to garments. The technique migrated to the US in the 1700s and remained relatively popular up until the Civil War.

The Tristan Quilt at the Victoria & Albert Museum in London.
The above quilt is at the Victoria & Albert Museum and is apparently the oldest quilt known to be still in existence, having been made in Sicily sometime between 1360 and 1400. It is constructed from linen padded with cotton wadding and quilted with brown and white linen thread.
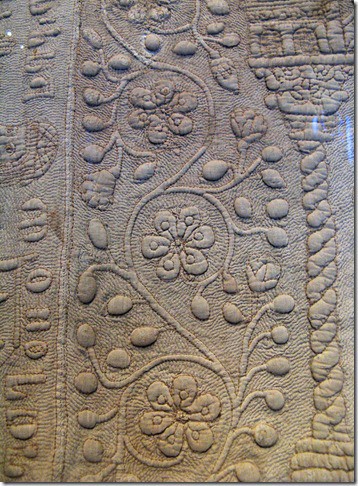
A detail of the Tristan Quilt circa 1360-1400
Back in my Costume Studies days (many, many moons ago) we studied the Trapunto technique. It can be a tedious and time-consuming endeavour, but the finished results are stunning. (It was made more tedious and time-consuming in my case because I used a piece of fronting fabric that had WAY too high a thread count, making the quilting part of the project difficult. It is generally advised to use a medium-weight fronting fabric and a light weight backing to make the stuffing part of the project much easier.)
There are a lot of new ways to produce the same look, but we were taught that the original technique was always done using white linen fabric (cotton in later times), cotton wadding, and linen thread. The materials were always white in color as the monochromatic palette accentuates the play of shadows and light on the design and creates a bas-relief of sorts, increasing visual interest and texture.
A modern interpretation of Trapunto work
The basic technique is to first lightly draw your design onto your fronting fabric, then add your backing fabric and quilt along the design lines (without any batting in between the front and back fabric layers. Once the design is completely quilted, small slits are made in the backing fabric in the area to be stuffed, then cotton wadding is carefully added to the area to puff it out and create the three-dimensional design. Once the section is suitably stuffed, the small slit is stitched back together, and you move on to the next section for stuffing.
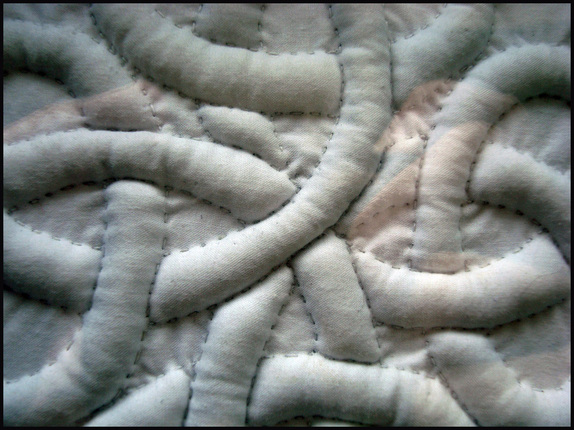
Close-up of my Trapunto-worked Celtic Knot
It was also common to use cording in addition to the wadding, creating intricate designs. Any backing areas that will contain cording are slit in two areas at opposite ends of the design and the cord is fed (via a needle) through the quilted channel from the first opening to end at the second opening. There are tutorials online that will give you an idea as to the basic technique, but really you can just play with your design and do it as you like! There are very good quilting books as well, that give step-by-step instructions.
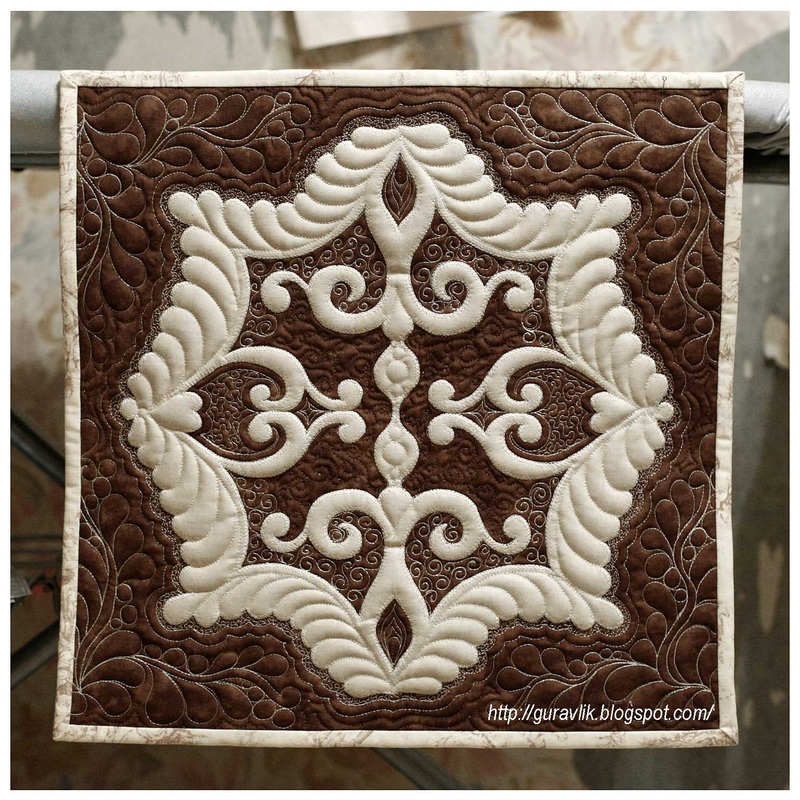
Check out the amazing modern trapunto work on this Russian (I think?!) blog...
If you choose to try Trapunto quilting, the key is patience. Take it slowly and understand from the start that this is not a one-evening project, but the end result is absolutely stunning and makes for a wonderful challenge!
Have any of you tried Trapunto Quilting? If you have, please share! :-)
|


 RSS Feed